myitcv.io/react - GopherJS bindings for React
myitcv.io/react is a set of GopherJS bindings for
Facebook’s React, a Javascript library for building interactive user interfaces.
go get -u myitcv.io/react
This is not the first attempt at creating bindings for React:
github.com/bep/grandgithub.com/leeola/go-reactare two currently active alternativesgithub.com/gopherjs/vectyis a React-like frontend tool-kit from the makers of GopherJS
myitcv.io/react takes a slightly different approach to all the above, making extensive use of code generation so that
the writing of components in Go code is as lightweight, simple and idiomatic as possible.
This blog post walks you through creating your first GopherJS React web application.
Background
GopherJS is a transpiler, that re-writes Go source code into Javascript code. GopherJS’s principal target is Javascript that will be loaded within the browser (as opposed to NodeJS which is more server or CLI-based) and so is ideally suited to web applications that need an interactive user interface.
React is a Javascript library for building user interfaces. Components are the fundamental building block of a React application. Components have their own state and can easily be composed to make more complex user interfaces.
myitcv.io/react is a Go package that allows you to build React components and web applications. Components are
declared in Go code that is then transpiled using GopherJS into Javascript code that is loaded within the browser via an
HTML page like any other web app.
Hello World is an example GopherJS React application.
Writing your own GopherJS React web app
The simplest way to start a new web app is via reactGen. reactGen can initialise a new web app but it is
also acts as the code generator that generates helper methods and functions as we write our React components (more of
that later).
Let’s first create a directory for our new web app†:
mkdir -p $GOPATH/src/example.com/helloworld

# change into the directory we just created
cd $_
Now let’s ensure we have the relevant packages available and that our PATH environment variable is set correctly:
go get -u github.com/gopherjs/gopherjs
go get -u myitcv.io/react myitcv.io/react/cmd/reactGen

# amend PATH to include target for gopherjs and reactGen
export PATH="$(dirname $(go list -f '{{.Target}}' myitcv.io/react/cmd/reactGen)):$PATH"
At this point you should be able to run reactGen -help to check it outputs something like:
Usage:
        reactGen [-init <template>]
        reactGen [-gglog <log_level>] [-licenseFile <filepath>] [-core]

  -core
        indicates we are generating for a core component (only do props expansion)
  -gglog string
        log level; one of info, warning, error, fatal (default "fatal")
  -init value
        create a GopherJS React application using the specified template (see below)
  -licenseFile string
        file that contains a license header to be inserted at the top of each generated file

The flag -init is very basic and only understands two value for now: minimal or
bootstrap. Both give you a minimal Gopher React application, the latter applies
a basic Bootstrap (http://getbootstrap.com/) template.

...
Let’s now create a template GopherJS web app:
# our current directory is $GOPATH/src/example.com/helloworld
reactGen -init bootstrap
We can now tell GopherJS to serve our web application to see the fruits of our labour:
gopherjs serve
If you navigate to http://localhost:8080/example.com/helloworld the resulting web app should look something like this:

The following list roughly summarises the sequence of events:
reactGen -init bootstrapcreates our basic web app:app.go,gen_App_reactGen.go,index.htmlandmain.go. This is essentially a Gomainpackage (with the import pathexample.com/helloworldgiven the directory in which we created it)main.godeclares themain()function;app.godeclares a basic React component,App, which renders the simple<div>,<h1>and<p>elements that make up our web appgopherjs serveeffectively does two things: transpiles the.gofiles intohelloworld.jsand then servesindex.htmlandhelloworld.jsfromhttp://localhost:8080/example.com/helloworld‡- The browser loads
index.htmland in the process loadshelloworld.jsvia the<script>directive:
<script src="helloworld.js"></script>
- Because our
helloworldpackage is amainpackage, a side effect of loadinghelloworld.jsis to run themain()function the package declares. This is therefore the entry point for our web application:
func main() {
	domTarget := document.GetElementByID("app")
	react.Render(App(), domTarget)
}
- React renders the
Appcomponent within the<div>with ID"app"which we see declared inindex.html
Once react.Render is called, we effectively hand-off into the React world and the React Component
Lifecycle takes over.
Creating a new component
The App component created as part of the skeleton web app is very basic. Let’s look at creating our own component,
FooBar, within the example.com/helloworld package and amending the App component to use FooBar. FooBar will
define some simple props and maintain some basic state to demonstrate the two key aspects of React components. The code
that follows defines the component and the code comments describe important aspects of the code:
// foo_bar.go

package main

import (
	"fmt"

	"myitcv.io/react"
)

//go:generate reactGen

// FooBarDef is the definition of the FooBar component. All components are
// declared with a *Def suffix and an embedded myitcv.io/react.ComponentDef
// field
//
type FooBarDef struct {
	react.ComponentDef
}

// FooBarProps is the props type for the FooBar component. All props types are
// declared as a struct type with a *Props suffix
//
type FooBarProps struct {
	Name string
}

// FooBarState is the state type for the FooBar component. All state types are
// declared as a struct type with a *State suffix
//
type FooBarState struct {
	Age int
}

// FooBar is the constructor for a FooBar component. Given that this component
// can take props (can, not must), we add a parameter of type FooBarProps
//
func FooBar(p FooBarProps) *FooBarElem {
	// every component constructor must call this function
	return buildFooBarElem(p)
}

// Render is a required method on all React components. Notice that the method
// is declared on the type FooBarDef.
//
func (f FooBarDef) Render() react.Element {

	name := f.Props().Name
	age := f.State().Age

	details := fmt.Sprintf("My name is %v. My age is %v", name, age)

	// all React components must render under a single root. This is typically
	// achieved by rendering everything within a <div> elememt
	//
	return react.Div(nil,
		react.P(nil,
			react.S(details),
		),
		react.Button(
			&react.ButtonProps{
				OnClick: ageClick{f},
			},
			react.S("Bump age"),
		),
	)
}

// ageClick implements the react.OnClick interface to handle when the "Bump
// age" button is clicked
//
type ageClick struct{ FooBarDef }

// OnClick is the ageClick implementation of the react.OnClick interface
//
func (a ageClick) OnClick(e *react.SyntheticMouseEvent) {
	s := a.State()
	s.Age++
	a.SetState(s)
}
At this point we need to run go generate within the directory
$GOPATH/src/example.com/helloworld to generate the helper methods and functions that complete our definition of the
FooBar component. Once you have run go generate you will see that the file gen_FooBar_reactGen.go has been
created.
So what did reactGen do?
- it detects components you’ve declared, based on the
*Defname suffix of a struct type and the embeddedmyitcv.io/react.ComponentDeffield - it detects a component’s corresponding props and state types based on struct types named
*Propsand*State - it generates some helper methods on your component definition type and the props and state types, e.g.
func (f FooBarDef) State() FooBarState - writes the generated code to a file named
gen_COMPONENT_reactGen.go, e.g.gen_FooBar_reactGen.go
So now our new component is ready to use. Let’s update the App component’s Render() method to use it:
// app.go

// ...

func (a AppDef) Render() react.Element {
	return react.Div(nil,
		react.H1(nil, react.S("Hello World")),
		react.P(nil, react.S("This is my first GopherJS React App.")),

		FooBar(
			FooBarProps{
				Name: "Peter",
			},
		),
	)
}
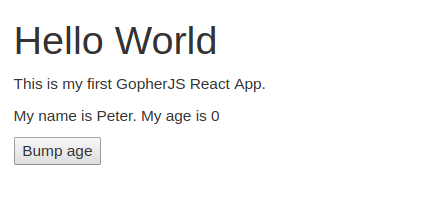
Now refresh the page in your browser and the we should see something like:

Clicking the button bumps Peter’s age as expected.
At this point it’s left to the reader to examine the definition of FooBar above and understand how the props and state
are used within the Render() method.
Conclusion
In this blog post we have:
- presented a basic introduction to creating GopherJS React components and web applications using
myitcv.io/react - seen how
reactGenis used to initialise skeleton web apps but also as a code generator when creating components - gotten a flavour for component props and state and how components can be composed to create larger web applications.
For more details see the godocs and the README and please feel free to raise issues with any problems/questions.
† - for the purposes of this walkthrough we assume a simple, single element $GOPATH.
If you have a multi-element $GOPATH please adjust as required
‡ - see also gopherjs -help for more details. You can of of course use gopherjs
-build to transpile to Javascript and then serve yourself.
Update 2017-04-17: improve wording in a couple of places.
Update 2017-05-23: fix up example post interface-based event changes.
Update 2017-07-26: updates following breaking changes introduced in https://github.com/myitcv/react/pull/73.
Update 2017-08-15: move away from named imports for simplicity.